Showing posts with label upcycling. Show all posts
Tuesday, October 4, 2011

WORMS!

I've been thinking about worms for a long time...

Most of Matthew and my waste these days comes from the leftovers from our produce; rinds, cores, and the like.  I know it seems like this is innocuous stuff to send to the landfill because it's totally biodegradable, but unfortunately it's not.  In short, the conditions in a landfill are not those such that food waste can biodegrade.  (For more information about this, you can read about it here and here.)  What's worse is that because the waste is in an anaerobic environment, it ends up producing a lot of methane which is a major greenhouse gas that is 21 times more potent than carbon dioxide.  (Which is another reason to consider eating less beef, since cows are amazing methane producers, but I digress...)

In Corvallis, we did our best to keep our food waste from going to the landfill by hauling most of each week's scraps to church on Sunday and handing them off to a family who owns goats and chickens who eat said scraps.  If you happen to live in Corvallis, you might be interested in their municipal compost heap.  They have "green carts" that you can put in all kinds of plant and food matter along with paper towels and certain paper plates/cups.  (You have to verify that the plates/cups that you use do not have a plastic coating on them which many of them do... You may think it's wax, but it's probably plastic.  Look for plates that say they are compostable, or contact the manufacturer and ask them what the coating is.  Or, better yet, just use reusable plates.)    We were unable to participate in this awesome program, though, because we lived in an apartment that didn't have a bin.  I considered asking our manager to get one, but I realized that based on what I found in the recycling bins, I didn't think that the people in our apartment would use the green cart properly.  I digress yet again...

Now that we are in Aloha, we know no farmers, have no green cart, but still eat fruits and veggies!  We also have a little outdoor storage closet... Enter the worm bin.


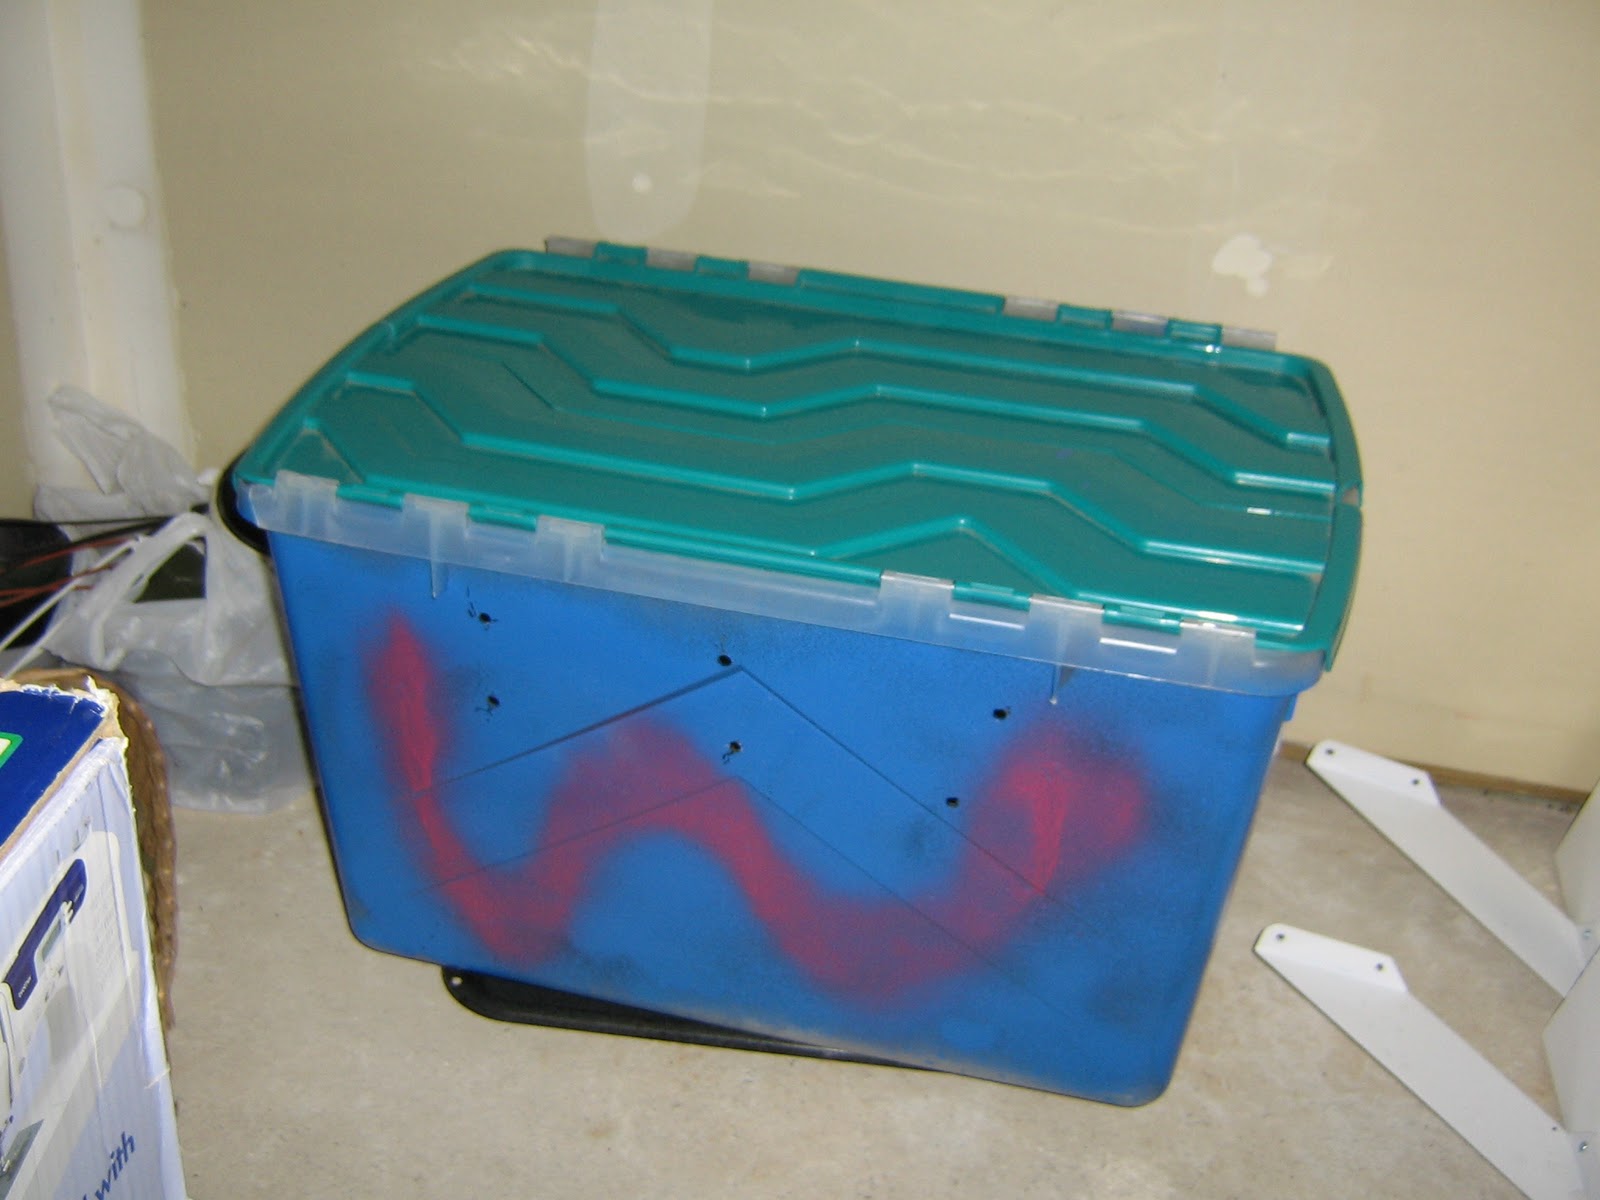
I found directions about how to set one up here and found fairly local worms here.  I bought my plastic tub at Goodwill for $2.99, and I used our drill to put holes in it for ventilation and draining.  As I was walking home with my container (seriously... who walks 1.7 miles hauling one of these things?  I do.), I remembered that worms don't like light, but I had just bought a clear plastic container.  I remedied this by using some random spray paint that we have.  (For the record, I hate spray paint.  It is full of nasties, as your lungs will attest as you spray it.  From here on out, I'm only buying canned paint and use a brush when we need to paint... preferably the low-VOC variety.)  I happened to have pink, so I painted on a worm.  Or a "W".  Or whatever your imagination says it is.  My wormies arrived in a little box in the mail today, and they were still wriggling, so they're alive.  I prepared their bedding, and I placed them in it, and then I tossed in the few scraps that I managed to save today.

Make worm poop, young pinkish wrigglers!  Then make more worms!  Then I will steal your lovely worm poop and throw it at plants!  It shall be MARVELOUS!
Wednesday, July 6, 2011

I don't blow my nose on trees anymore...

Why?  Maybe because I like hugging them.


Actually, that's not the reason.  Although, hugging that tree would have been a lot more gross if someone had blown their nose on it.

Honestly, I can't keep up with the politics of tissue making.  I know that Kimberly-Clark (the makers of Kleenex) has gotten a lot of flack about their practices.  I think they were chopping trees down in an unsustainable manner and in a way that was harming habitats and such.  Regardless, even if we find a good way to source the trees, there is still a water-wasting, energy-intensive, chemical-filled process that turns a chunk of brown wood into a fluffy, bright white cloud for your nose.

I avoid keeping up with the politics and the chemicals by avoiding tissues altogether.  I have been struck down by a ridiculous head cold these last few days (the kid who gave it to me might have gotten extra homework when I tutored him yesterday...), and I have been blowing my nose on cloth.  I have used a few handkerchiefs that I used to use to pull my hair back during middle school when it was still fashionable (I think?).  I also made a stack of handkerchiefs out of the scraps of the sheet that I used to make drawstring bags.  Finally, I have even been using a small stack of real, bona fide frilly hankies that I got my hands out.  Nothing is too good for my nose goo.  Except maybe trees.

To rinse them out, I leave them in the sink for a while and we wash our hands over them.  Then they are ready to go in the laundry, get cleaned, dry in the sun, and then be used again!

Hooray for being sick!  No...  I don't think I mean that.  I mean, hooray for avoiding disposables even when being sick!
Friday, July 1, 2011

Sunny Side Upcycle - June

Here is this month's Etsy creations.  All except for the whale and the bunny still remain for sale at sunnysideupcycle.etsy.com! :)


Thursday, June 30, 2011

Dress Shirt Shirt Dress


It's a shirt dress!  Made out of a dress shirt!  The dress shirt was a large long sleeve men's shirt on its last legs at Goodwill (its tag color was the 50% off color this week), so I made this for $4.  It's hard to see it, but it has little white, dark blue, and light blue stripes.  I got the idea from here; however, I pretty much just changed things around to suit me.  I wanted a tie in the back and thicker straps/sleeves, so I did that.  I also found that adding darts in the back added a nice touch and kept it from poofing too much.  FUN!
Monday, June 27, 2011

I Heart Produce Bags

This is my latest, greatest version of a reusable produce bag.  While I have made a number of drawstring bags, I like this style because it is easier to see the produce inside of the bag.  It is also very fast to make thanks to the fabulous properties of knit shirts.  I made this out of scraps of a shirt, and it took about 10-15 minutes.

Here are the instructions.  It's a very forgiving process.  Enjoy upcycling your worn out shirts into produce bags! :)
Wednesday, June 1, 2011

I'm now Sunny Side Upcycle on Etsy!

You may have noticed that I like making things.  Like whales.  I like to make whales.  The thing is, I like making more things than I can use.  I have given some things away, too, but there is always more to make.  So I finally took the plunge.  I opened an Etsy shop.  I feel my self-confidence waning as I offer my crafts to the world's scrutiny.  However, I hope that people enjoy what I do, and I will be happy if my scraps can become someone's treasure.

If you are curious, you may visit my little shop here.  More items should be coming in the future, but I have put up my inaugural whale!
Wednesday, March 30, 2011

I know it's Spring, but...

Look at how cute he is!!!
I saw a picture of a sock snowman on a blog I read, and my heart was immediately filled with joy!  I have a pile of Matthew's old socks that have holes in the heels, and I suddenly knew what one of them was going to be used for.   (Lest I leave you wondering, my socks get holes too, but they are better able to be used as handkerchiefs when we are moping around the house with a cold.)

I grabbed the old socks, and dug into my bag of small scraps leftover from projects.  I used a couple pieces of thread to tie his belly off, and then used a scrap of the old sheet used to make my sundress to make a scarf.  Markers were used to make the face, and voila!  Adorable little snowman!  Oh, the little gray hat is complements of the grey toe that Matthew's sock has.

I'll probably make a few more of these in my lifetime... Buttons might be used in the future.  Fabric scraps might also be used to make fun hats.

*crafting bliss*
Saturday, March 12, 2011

More finished projects...

Not the greatest picture, but here are the three potholders I made.  The one on the right is a deep red.  I posted the directions for this project here.  I had to scale things for each one though because I had three different types of yarn.

It's almost finals week here, and I don't have a lot that I need to do for it this term.  Yay!  However, those of you who know me remotely well know that I tend to do more than I need to when studying... To prevent that, I gave myself a project last night.  I had a used sheet that I bought at Goodwill, and I decided to turn part of it into a dress.  I used a pattern to give me a rough idea of how to do the top, but I'm pretty proud of myself because most of this I did by just making guesses and decisions as I went.  Matthew even helped on this project because he held the back up each time I tried things on, and he pinned things in the the back as I went.  I feel like I should be wearing this sundress in a field of flowers, but it's pretty gray and sprinkly today, so here I am in front of our door.
Wednesday, March 2, 2011

Tutorial: How to make a simple drawstring bag

In order to reduce waste, Matthew and I have reused plastic bags for bulk and produce goods at the store.  However, plastic bags get holes, are difficult to clean, and end up in the garbage quicker than they need to.  I felt like we should just go ahead and have fabric bags.  Buying bags is an option, but it costs a fair amount of money per bag, and they are so easy to sew...

I almost had a dilemma when buying fabric.  I didn't have enough scraps to make bags, but I wanted to avoid buying new fabric.  (Organic fabric is fairly expensive, and growing non-organic cotton involves a lot of chemicals... but that's another story.)  I had a light bulb moment - Used sheets!  We didn't have time to wear out our sheets, but I found some old sheets at Goodwill.  Upcycling!

Without further ado, here is how to sew a drawstring bag for your produce and bulk needs!

Materials:
1) Enough fabric to make whatever size bag that you want.  Remember that you will lose a few inches to seams.
2) Thread that goes with your fabric.
3) Scissors or rotary cutter and board.
4) Pins
5) A safety pin
6) Enough yarn or cord to make a drawstring.
7) A sewing machine unless you prefer to hand sew!

Steps:
1) Cutting out your fabric
The main goal here is to end up with a rectangular piece of fabric that, when folded in half, is just a bit bigger than the bag you want to result.  The piece that I am cutting here was 19"x28".  If you can't cut that big of a piece, you can cut two equal sized pieces.  Just remember that if you do this, you will lose a little extra to a second side seam.


2) Sewing the bottom seam
First fold your bag in half with the printed side on the inside of the bag as seen below in the picture on the left.  Next fold up and turn in the raw edge of the bottom of the bag.  Pin it as you go.  You can see this in the picture below and to the right.

 This is what you should see when you are finished pinning.  Now you are ready to sew your first seam.

 As you can see here, I am sewing a seam very close to the tucked under edge.  When this seam is complete, you are finished with the sewing the bottom of your bag.


3) The side(s) of the bag
The pinning process will be generally the same as with the bottom of the bag.  If you need to sew both sides, first sew one side completely as you did the bottom seam.  One side seam will need to stop about 3 inches from the top of the bag as seen below.  (The top three inches are needed to create the case for the drawstring.)  Pin and sew this side making sure to leave the 3 inches on top.
 4) The drawstring casing
First make a small cut just above your side seam so that the top three inches of fabric are not being twisted by the side seam.


 Next baste the flaps onto the bag as seen below.
 Next you are ready to fold over the fabric for the drawstring casing.  Make sure that you tuck under the raw edge so that it is not left out.  First pin both of side of the casing at the side seam, then continue pinning in a circle until the entire top is pinned.  This process can be seen in these two pictures. (Sorry that the first one is a bit blurry!) After pinning, sew your seam.


5) The drawstring
Take your yarn or cord and lay it folded across your bag so that you can cut the appropriate amount.  Make sure to leave a little to make a knot.  I actually use a double strand of yarn to make it a little thicker.


Loosely tie your yarn to the safety pin and use the safety pin to help push the yarn through the casing.

 When you reach the other side of the casing, tie a knot, and you're done!


Yay for cute little drawstring bags!
Monday, February 21, 2011

Bedroom wall before and after

After we got married, we bought these picture frames to display our photos. They are kind of dull though...


However, I decided to put all of the sleeves from the CDs I've using to make CD art to good use!
Cute little frames!


More CD art...

I posted here instructions on how to make this fun craft using otherwise wasted CDs. This weekend I went on another CD painting spree, and this is now the final collection on our living room wall. Some of them are difficult to see when captured on camera, but you can get an idea of what they turned out like!


Blog Template by BloggerCandy.com